This is used to guide the thread and will move up and down as you sew and connects with the bobbin.
Upper Thread Tension Dial
This is used to adjust the amount of tension of the upper thread. If the top stitches seem to be too tight, lower the tension. If the top stitches are too loose, tighten the tension. The manufacturer usually marks this dial with a line that indicates the normal range (between 4, 5, and 6). The numbers usually go up to 9. Start with the tension within the normal range and adjust accordingly.
Upper Thread Guide
These are the guides that the thread feeds through. Some machines have marks that you can follow along when threading the machine.
This video was created by Niler Taylor and placed on YouTube with embedding enabled. Visit her Playlist on YouTube.com.
You might find the following posts to be very helpful:
This video touches on some important parts of the machine. For example:
Thread Spool Pins:
There are usually two thread spool pins. These are the tall spindles on top and all the way to the right.
The back pin holds the top thread that threads the machine.
The front pin holds the spool of thread that is used to wind the bobbin.
In some older machines, the top thread spool is also used to wind the bobbin. This is somewhat inconvenient because you have to remove the spool that threads the needle and replace it with the spool used for winding the bobbin.
We’ll discuss threading the machine later on, but I just wanted to point out that there are two thread guides. One is for threading the needle of the machine, and the other is for winding the bobbin.
Bobbin Winding Spindle
This is the small spindle that holds and winds the bobbin. The spool of thread sits on one of the tall thread spool pins, and the thread goes around the bobbin thread guide to the bobbin. The bobbin snaps against a small post that will detect when the bobbin is full, and the winder will stop spinning automatically.
I use Coats & Clark Dual Duty All-Purpose Thread. Start out with some basic colors – black, white, brown, navy blue. When purchasing fabric, always buy matching thread. Then with each sewing project you can add to your thread collection.
Presser Foot Pressure Regulator:
This is what you use to adjust the pressure of the presser foot on the fabric.
To increase the pressure, push down on the inner pin. For ordinary sewing, the inner pin should be pushed all the way down. To decrease the pressure push down on the outer ring.
Insufficient pressure may cause poor feeding of the fabric, skipped stitches, or difficulty in guiding the fabric.
When sewing multiple thickness or heavy fabric, decrease the pressure. When sewing lighter weight fabric, increase the pressure. If feed dog or presser foot marks appear on the fabric, decrease the pressure.
Most home machines don’t have a pressure regulator. If it does, it is usually preset by the manufacturer and very rarely requires adjusting. Refer to your manual to identify the parts to your machine.
This video was created by Niler Taylor and placed on YouTube with embedding enabled. Visit her Playlist on YouTube.com.
You might find the following posts to be very helpful:
This series will teach you about the different parts of your sewing machine and what they do, setting up your sewing area, winding the bobbin, threading the sewing machine, taking body measurements, choosing the pattern and fabric, cutting the pattern and fabric, and sewing a skirt from start to finish!
Setting Up Your Sewing Area
Before we get into the necessary steps to using a sewing machine, you want to make sure that your sewing area is comfortable and convenient, and that you have the necessary tools to work with. Refer to our post titled, Welcome to the World Of Sewing, where we show you some of the basics.
Part 1 – Sewing Machine Safety
This course was designed for those who have little or no experience with a sewing machine, even those who have never seen a sewing machine before. After going through this course, videos 1 through 11, you should be familiar with the different parts of the sewing machine, how they operate, and, hopefully, be able to put a simple garment together.
Safety Warnings:
This video expresses the importance of sewing machine safety. Even though this is a course for beginners, it is not designed for children under the age of 18. No child should ever be left unattended when they are around a sewing machine. Make sure your child has adult supervision when taking this course.
Setting Up Your Sewing Machine
When setting up your sewing machine, make sure that you place it on a sturdy surface that doesn’t wobble. Never operate your sewing machine while on a bed, couch or chair because you could damage yourself or the machine, or break the needle. Also, the soft surface might interfere with the circulation beneath and around the bottom of the machine.
Make sure the table is a proper height or use a comfortable and adjustable chair.
This video was created by Niler Taylor and placed on YouTube with embedding enabled. Visit her Playlist on YouTube.com.
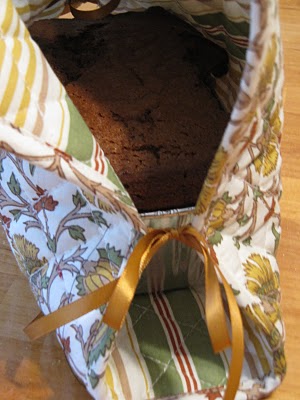
Any one of these beautiful casserole/pie carriers would make a great housewarming gift, or something special for a friend during the holidays. Take it one step further (or even two or three steps further depending on your budget), and add a dish and a decorative bag of ingredients, with the recipe attached. Isn’t that a great gift idea? Wouldn’t you love to receive a gift like that? I know I would!
These Casserole and Pie Carriers are the perfect tote along for holidays and events. If you’re showing up somewhere with a homemade dish, you’ll want to keep it warm and ready to eat.
Turn your ordinary placemats into something new with the Placemat Casserole Carrier. Whenever you need to take a cooked dish somewhere, this casserole cozy will be useful. Plus, it’s easy and fun to make!
If you’re traveling with a dish, keep the food warm until it’s time to eat. With the Cozy Toter casserole carrier pattern you’ll have a great sewing project that’s useful and easy to make.
Casserole Tote: Everyone needs a handy Casserole Tote for family gatherings and parties. This casserole carrier pattern features fabric handles and easy open flaps. Make this sewing project and you’ll love the results.
Casserole Carrier: Looking for a free casserole carrier pattern? This Casserole Carrier will come in handy for potluck dinners, events and parties. With a solid handle, you’ll be able to take this useful craft anywhere!
Insulated Casserole Carrier: You’ll find yourself needing an Insulated Casserole Carrier at some point this Summer. With all the picnics and parties coming up, don’t get caught without the proper casserole carrier. Follow this sewing tutorial and create the useful craft.
These adorable flowers can be used to accessorize headbands, barrettes, purses, bags, hats, scarves, brooches, etc. They are so quick and easy to make, and would be great gifts.
Materials Needed:
small strip of fabric 14″ long x 2-1/2″ wide*
heavy-duty thread
buttons
hand-sewing needle
scissors
You can use any fabric you choose. This video shows flowers made with polyester knit and fleece.
This ruffled flower is hand sewn, but could be easily sewn on a sewing machine if you prefer. Just set your stitch length to the longest so that you can easily gather the fabric.
Also, I haven’t tried this but I think it would be very pretty. Use Organza and Chiffon. Make several flowers, alternating the organza and chiffon. Then, layer them on top of each other and sew together. Embellish the center with a brooch or satin button.
Following is a video that shows how to make a shoulder adorned wedding flower. It is exquisite.Continue reading »